

Regardless of the type of table saw you have in your workplace. At some points, you will want to increase the ripping capacity while working with a large piece of plywood.
To do this there are loads of methods, I’ve gone through a couple of them that actually make sense doing so, I’ll list them out here.
But before we talk about the ways, you should know what so-called rip capacity is and why it matters a lot for a table saw.
A saw blade’s rip capacity is the distance between the edge of the blade and the cut fence when it is moved at the maximum distance possible. To put it simply, it is a measurement of how many inches a table saw can cut.
The longer the rip capacity a table saw has means the wider a piece of wood can be ripped off.
Nevertheless, if you are unsure of the proper rip capacity for your table saw. Let’s first get into it.
| Rip capacity | Ideal pieces to cut |
| 28 inches | Comes in small table saws, capable of cutting one 48″ sheet in half. |
| 30 inches | Most table saws have this- able to cut in half a 56 inches long sheet. |
| 50 inches | Rarely come up, mainly larger saws that have this longer rip capacity. Able to cut in half longer wood pieces. |
How to extend a table saw’s rip capacity.
There are multiple ways to do that, and in this blog, I’ll cover all the main ones.
However, the basic idea is very simple.
One method for expanding a rip capacity is to add up another table, which you can build yourself if you invest the time and money. It works for both, either rack and pinion system and sliding fence system.
The second way is to purchase a ready-made extension, there are plenty of them available on Amazon, look for one that can fit with your table saw.
Or lastly, some table saws offer adjustable fence systems, all you require is to make a hole for additional screws to slide the rip a little further.
Now that you have a bit of an idea of how to achieve this, let’s explore each method and see what their pros and cons may be and which method would work best for your table saw.
1. Adding a table to your saw to increase its rip capacity
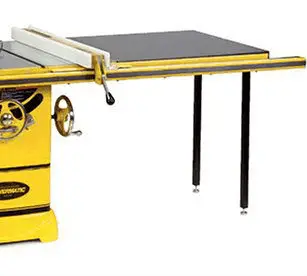
The easiest way to increase the rip capacity is to add up a piece of board, like a table. It should be the place where the fence is moved towards probably on the right side in most table saws.
This method is the easiest one nonetheless the most effective in terms of extensibility. Such that, you can extend as long as your needs require.
Moreover, because of the reason you add up an additional board you can not only enlarge it but also widen it if you wish, it helps keep the wider boards stable.
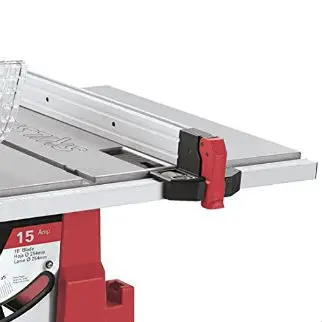
With this method most of the parts, a simple fence clamping system seems easy to install on another table. Luckily the majority of table saw’s fences work in this way.
Shown below in the image. Fence clamping system.

Except for DeWalt’s ones which have rack and pinion systems. Nonetheless, you can still extend their rip capacity, but due to their unique system of moving fences, it’s a bit difficult to do so.
Shown below is the image: rack and pinion system.
I’ve seen dozens of tutorials on YouTube yet didn’t find any useful for extending the capacity of rack and pinion systems. Instead, there are tutorials for simple fence clamping.
I’m sharing here links so you can watch and follow along.
This video tutorial is the one I found easiest to follow.
PROS
Increase as more you need– Since it’s on your hands how long you want to extend, you can add an additional table of the same length.
Adjustable– Depending on the rails, clampings, you can adjust the added table to work fine.
Easy to do– The method is quite straightforward for saws with a clamping system. However, some difficulties are to be faced with DeWalt’s saws.
CONS
Expertise is required – While setting up a table, the only thing that makes things complicated is synchronizing the rails over the additional table.
Pricey– As you’ll need tools along with a table in order to set this up, you’ll have to spend some cash on it.
Adjusting the existence fence
As the name implies: A fence is simply shifted over the existing rail, giving you an extra inch of ripping room.
Jay’s Custom Creations has one tutorial about making the same thing on a table saw and he uses a Grizzly 0690.

The process is also demonstrated in this video.
Many tables saw have adjustable fence systems that can be extended to a limited length. Such that capacity of 28 inches can be extended to 30 inches or a little more than that by just making some more holders (screws onto the rail fence).
The method comes into existence with table saws that have an adjustable fence system installed. There are many of them that can be extended to what they are limited to just by adding a few screws to them, this is what most people are unaware of.
It is not necessary to use any extra hardware to make this method work, so it is inexpensive. It will however only work for saws with adjustable fence rails and ample space for fence extension.
Since it’s a matter of changing the fence or adjusting the built-in one. So, it is a bit of a laborious method, requiring disassembling, precise measuring, as well as right adjustments.
Still, by watching some videos regarding how to make it work, you will find it pretty easy to follow along as long as you are dedicated to the outcome.
Install all the necessary screws to support the fence, and make sure you have enough clearance for it to slide.
Make sure that adding a few screws and nails can extend the maximum limit that manufacturers have set.
Usually, it goes like this:
- Takedown the fence and rails
- Shifting it over
- Drilling new holes
- Putting the fence back together
- Changing the measuring indicator
PROS
Cost-effective– There are no extra additional parts are required, thus it saves you money.
Looks professional– If you follow this method correctly the end result looks professional.
CONS
Time taking– The method takes a lot of time since modifying a fence will require drilling holes.
Require precise measurement– Before drilling new holes, double-check the measurements to avoid mishaps.
3. Find extensions for your table model.

This is the last method for increasing rip capacity. In this, you will need to buy a built-in extension that is suitable for your table saw. A number of manufacturers offer this, so you will need to be sure the extension will work with your table saw before purchasing.
The second method involves a trade-off between money and time and effort in order to create one extension for you. Given that, you are likely to have to spend a substantial amount of money on that.
PROS
Easily installable– If you find a table saw extension that fits your table, you will not have to worry about installation.
Nothing needs to be changed– A lot of saws include room for an extension, so you do not need to make holes in your saw to make it work.
CONS
Model limitations – The only problem with this method is to find a suitable extension, the fact is not all of the saws have room for such an extension.
Expensive for some individuals- Buying an extension is expensive, due to the time and money involved, as opposed to building yourself.