
When mentioning different terms in woodworking. We often ignore telling newcomers about cauls and their importance.
And why should you need them for your gluing-up project?
In this blog post, we have attempted to provide everything you need to know about cauls.
Have you ever wondered!
What did our predecessors (carpenters) use when they needed to affix something large like a board or a panel?
Usually when multiple panels of 48″ or greater need to be glued together.
They did not use clamps, because the clamps we have today weren’t available at that time.
Let me tell you. They used wood cauls in most of the gluing-up projects.
But not with clamps like we do, instead they used to exert pressure to both sides by putting weight so that panels would adhere tightly.
Table of Contents
Here is what are cauls in woodworking?
It’s no science to understand the term “cauls” in woodworking, they are simply pieces of wood used for gluing-up projects.
When clamping a large panel for instance we use cauls to exert pressure in the middle- as the curve bends inside, as well as exert pressure on areas that are beyond the reach for standard clamps so we can get a flat glue-up regardless of the longevity of the panels being glued.
They make it easy to get a strong bond, and also reduce the number of clamps to be used in a project.
They are mostly needed when joining large panels because standard clamps only pressure on the edges.
And on larger panels, there is a need to pressure them in the middle.
What does a wood caul actually work?

As we’ve mentioned they are basically beams made of wood, nothing else is to describe here tough.
However, given them, a name makes them an important tool in woodworking.
So we use them for exerting pressure where panels cannot reach.
Their shape is actually curved, allowing more pressure to be exerted.
As the curve in the caul bends towards the panel being glued in the course of pressure.
The other end will be slightly raised when it is clamped to the panel.
However, the second end, when clamped to the panels, applies pressure to the panel center.
You will achieve an even and solid glue-up this way.
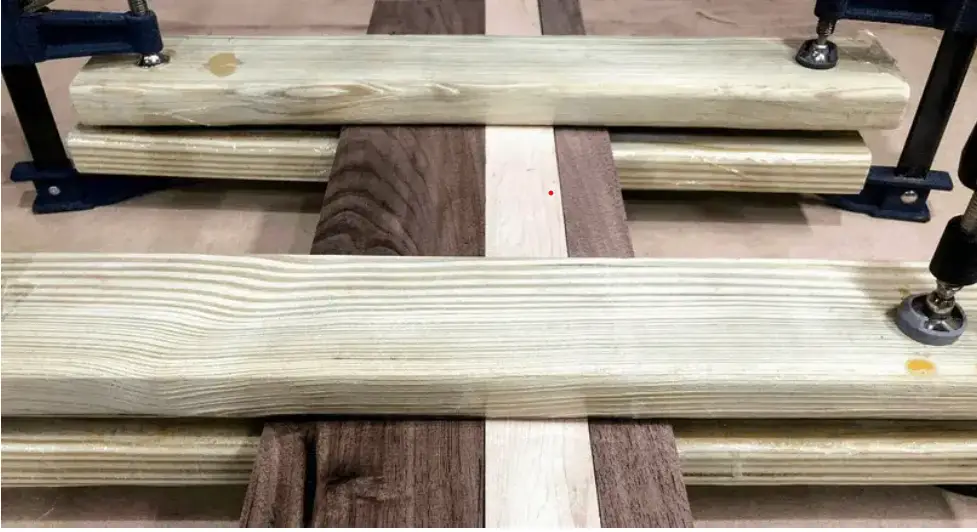
Let’s illustrate this by taking a working example.
Imagine you got two large panels.
Now you want to face gluing them to increase thickness, perhaps for crafting a tabletop or a door.
To proceed you will have to apply pressure evenly to the panels after gluing them so there are no gaps and you can get a flat glue-up as your result.
Despite the fact, if gaps exist, even small gaps can weaken the bonding strength and you will not achieve a flat result.
And if you only use standard clamps, when bonding larger panels, the majority of clamps will not reach the middle regardless of the number of clamps you have in your workplace.
Both F clamps and perpendicular clamps would not do the trick unless you use cauls.
There comes down the use of wood cauls.
By using 2 by 4s sized cauls you will have to overlap panels needed to be glued together.
After that, you can press on the edges with the F clamps, while distributing pressure evenly throughout the surface.
Reasons: Why do you need clamping cauls in gluing-ups?
Clamping cauls is like a helping hand regardless of the gluing project you are dealing with.
Some of the benefits of the cauls are listed below.
Create pressure beyond standard clamps- They are frequently used to apply pressure to a bigger surface where standard clamps may not be effective.
Keep the panel flat during glue-up- When you glue, the most important thing to remember is to make sure that the panel is flat from all over the surface.
For this, the wood cauls do the trick since they create pressure which helps large panels get clamped thoroughly.
Minimize the amount of work- Even if your clamps can create in the middle, assuming the panels are not that big.
In spite of this, you can still minimize the amount of work by using cauls since they create more pressure and require a few clamps.
Keep the panels aligned- During a panel glue-up, cauls are often used to keep the boards aligned, since it is important to keep the panels steady during the process.
A little movement can ruin the process and you will need to restart from the beginning again. A situation you do not want to occur.
How thick should Cauls be?
It is important to keep in mind the cauls’ flexibility. Thinner materials are less flexible and more fragile, which leads to them snapping.
The 2-1/2″ thickness is ideally suited to cauls that measure about two to three feet in length.
- So When making cauls of larger beams such as 28″ long, keep the thickness minimum 2-1/2″ thick, and 1-3/4″ wide.
How to choose a suitable material for making Wooden Cauls?
Before we start demonstrating, there are some factors regarding the material you will be using that you should take into account.
It will help you save a lot of trouble and will lead you to make cauls that will last for years.
As we already mentioned the ideal thickness. So, you can follow that regardless of the size you are making cauls of either 24” long or 28”.
Just make sure you don’t use wood board thinner than 2’’ inches to provide it enough strength.
Now the major issue is there to choose the material.
If you are unsure of what material is best, you might feel confused.
This process works best with any kind of wood material. For instance, you are good to use any good-quality engineer board, such as cherry, oak, acacia, etc.
Try to avoid materials that have low strength and is more prone to get water defects.
Whenever possible, avoid materials that have low strength and are prone to water damage.
How Do You Make Wooden Cauls?
First of all, you should run the material through your joiner to create an even edge and then the planer to make two parallel surfaces.
If you don’t have any of the tools you can read this blog post on what to choose instead of a planer.
Make the surface of the panels being glued slightly convex – causing it to bend – in order to exert more pressure on the center of the surfaces.
You can do this by using a jack planer. Take the ends of the piece down to the mark, measuring down 1/32″ at each.
By doing so, the piece will become slightly convex, or cambered, at the center, allowing it to exert more pressure- which is good.
There is very little pitch, only 1/32″, meaning the caul will not crack or split from pressure on the flat portion.